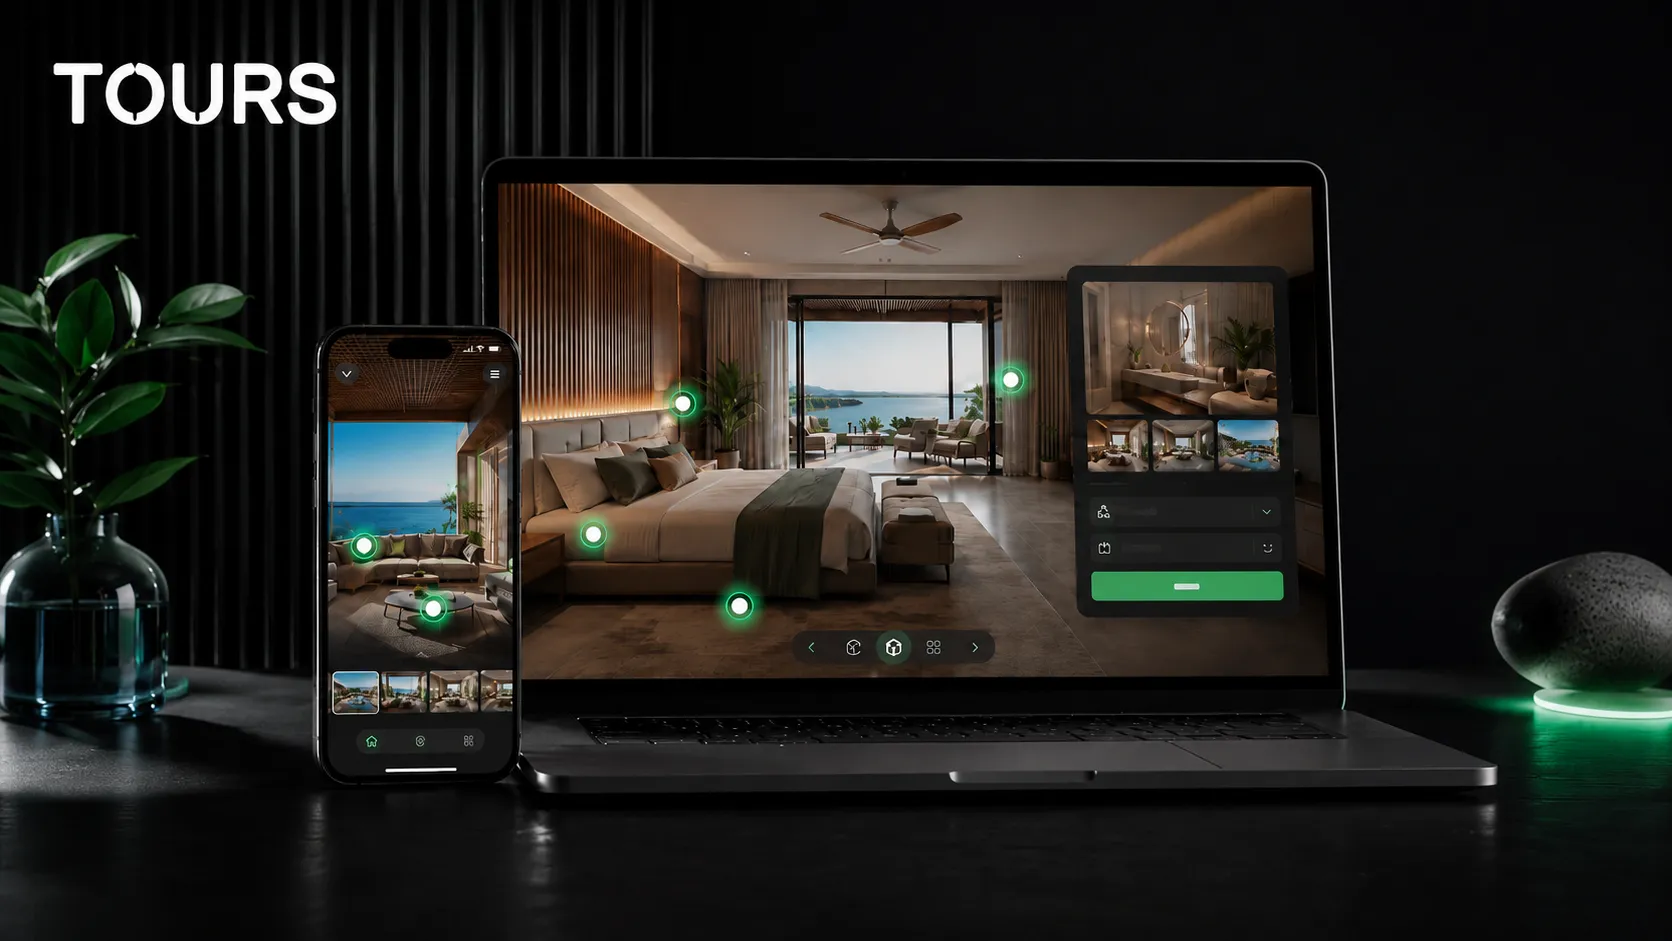
If you have already created a tour in Tours and want to embed it on your website, you do not need to write code from scratch. After publishing, go to My Tours, find the tour you want, open the three-dot menu and click Integration. From there, choose the option that fits your site — HTML, React, Angular, WordPress or Wix — then copy the generated code.
In the same window you can enable or disable the integration and decide which domains are allowed to display the tour. You have full control over where the tour appears without going back into the editor or changing any tour content.
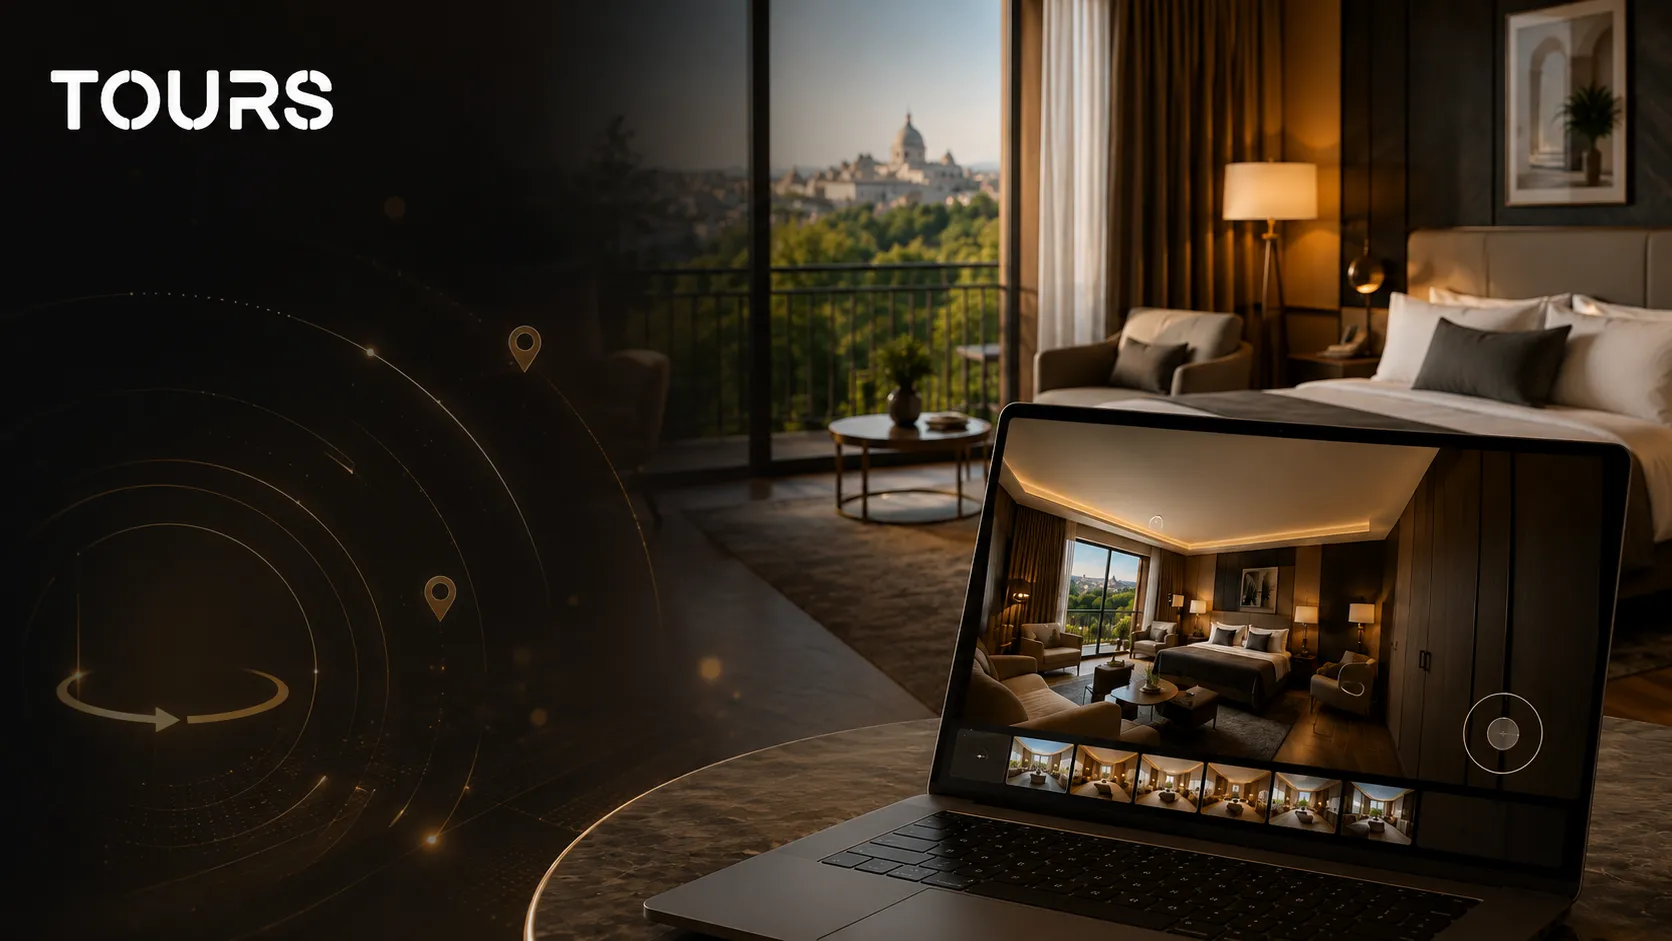
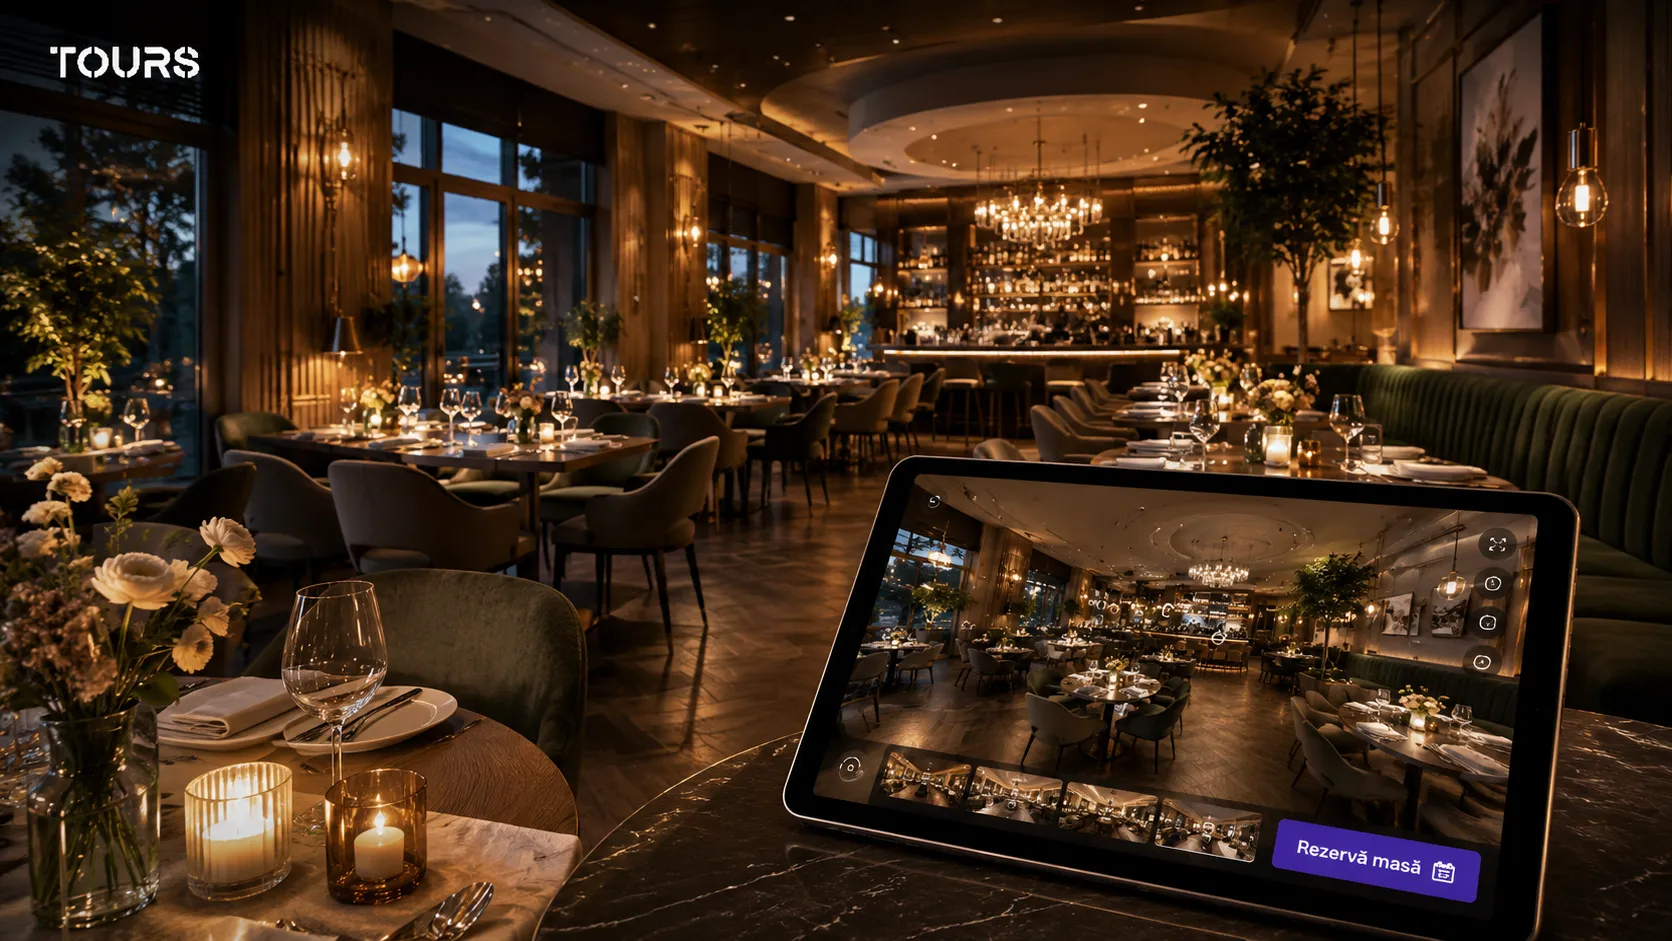
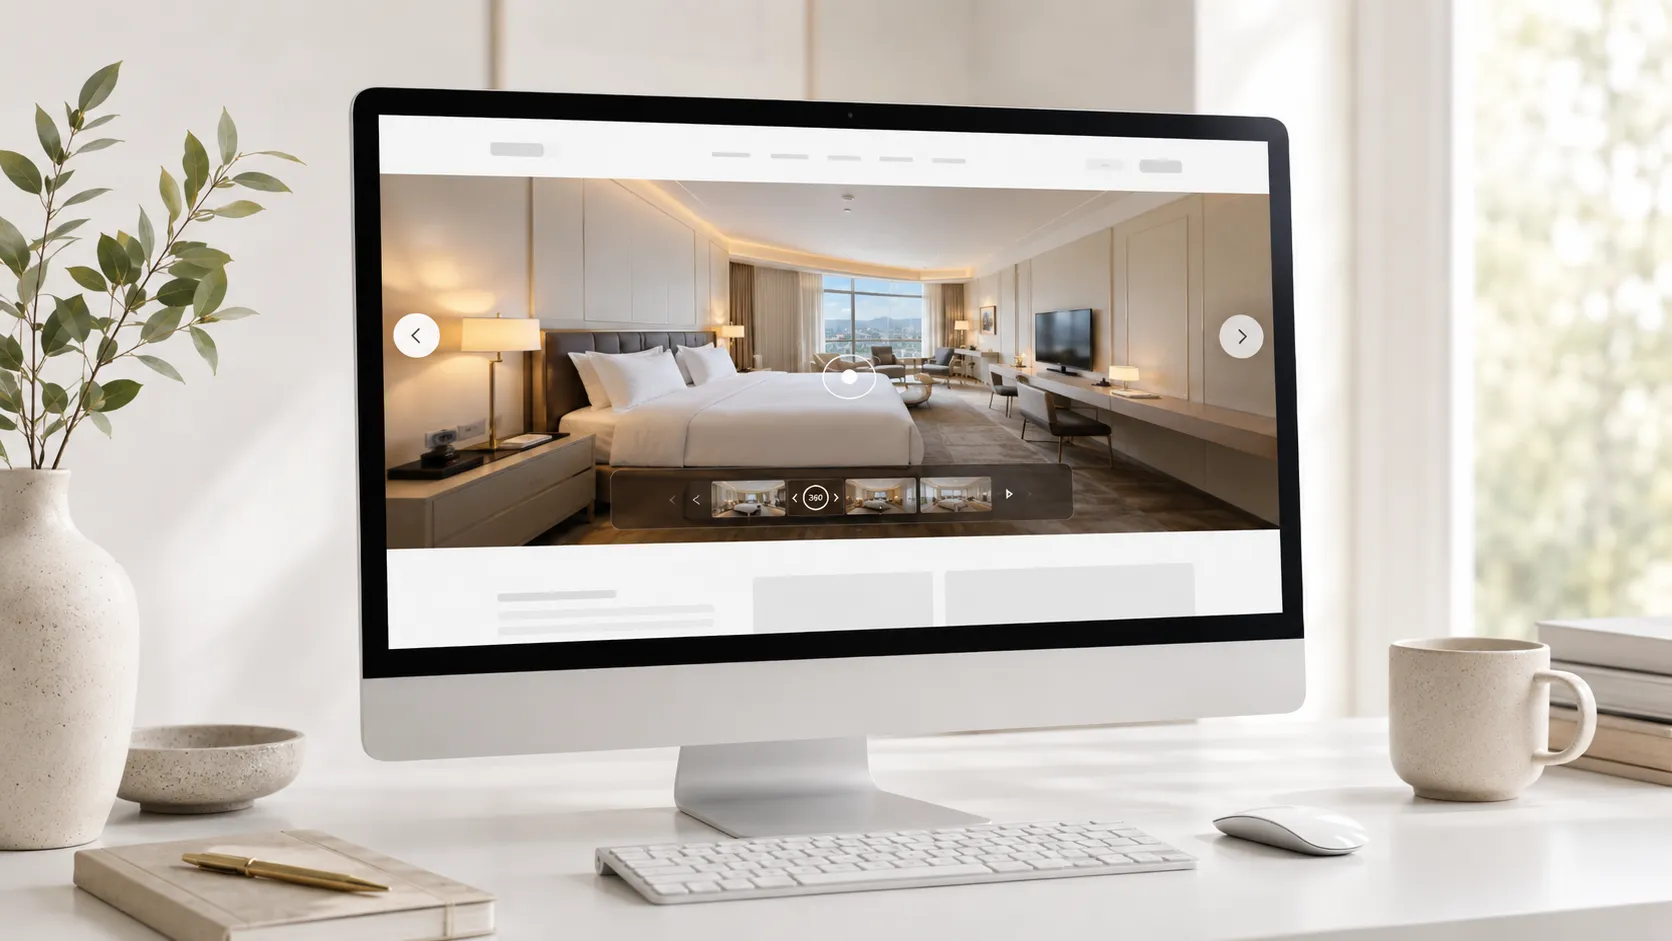
For the visitor, the result is seamless: the 360° tour opens directly on your page. You are not sending them to another site, pulling them away from your presentation page or asking them to find a separate gallery. They can explore rooms, tables, apartments, showrooms or event spaces right alongside your description, offer, contact form or booking button.
Quick Summary
- A virtual tour embedded on your website appears directly on your page, not as a separate link to another platform.
- In Tours, the integration code is found in My Tours after the tour has been published.
- The steps are: My Tours → three-dot menu → Integration → choose your platform → copy the code.
- In the Integration window you can enable or disable the tour from appearing on external websites.
- You can set which domains are allowed to display the tour so it cannot be copied anywhere.
- Code options are available for HTML, React, Angular, WordPress and Wix.
- If you update the tour in the editor, the version embedded on your site updates automatically.
- The integrated tour can include 360° scenes, interactive hotspots and usage statistics, and if you have enabled a commercial flow, it can also show actions such as booking.
What does integrating a virtual tour on a website mean?
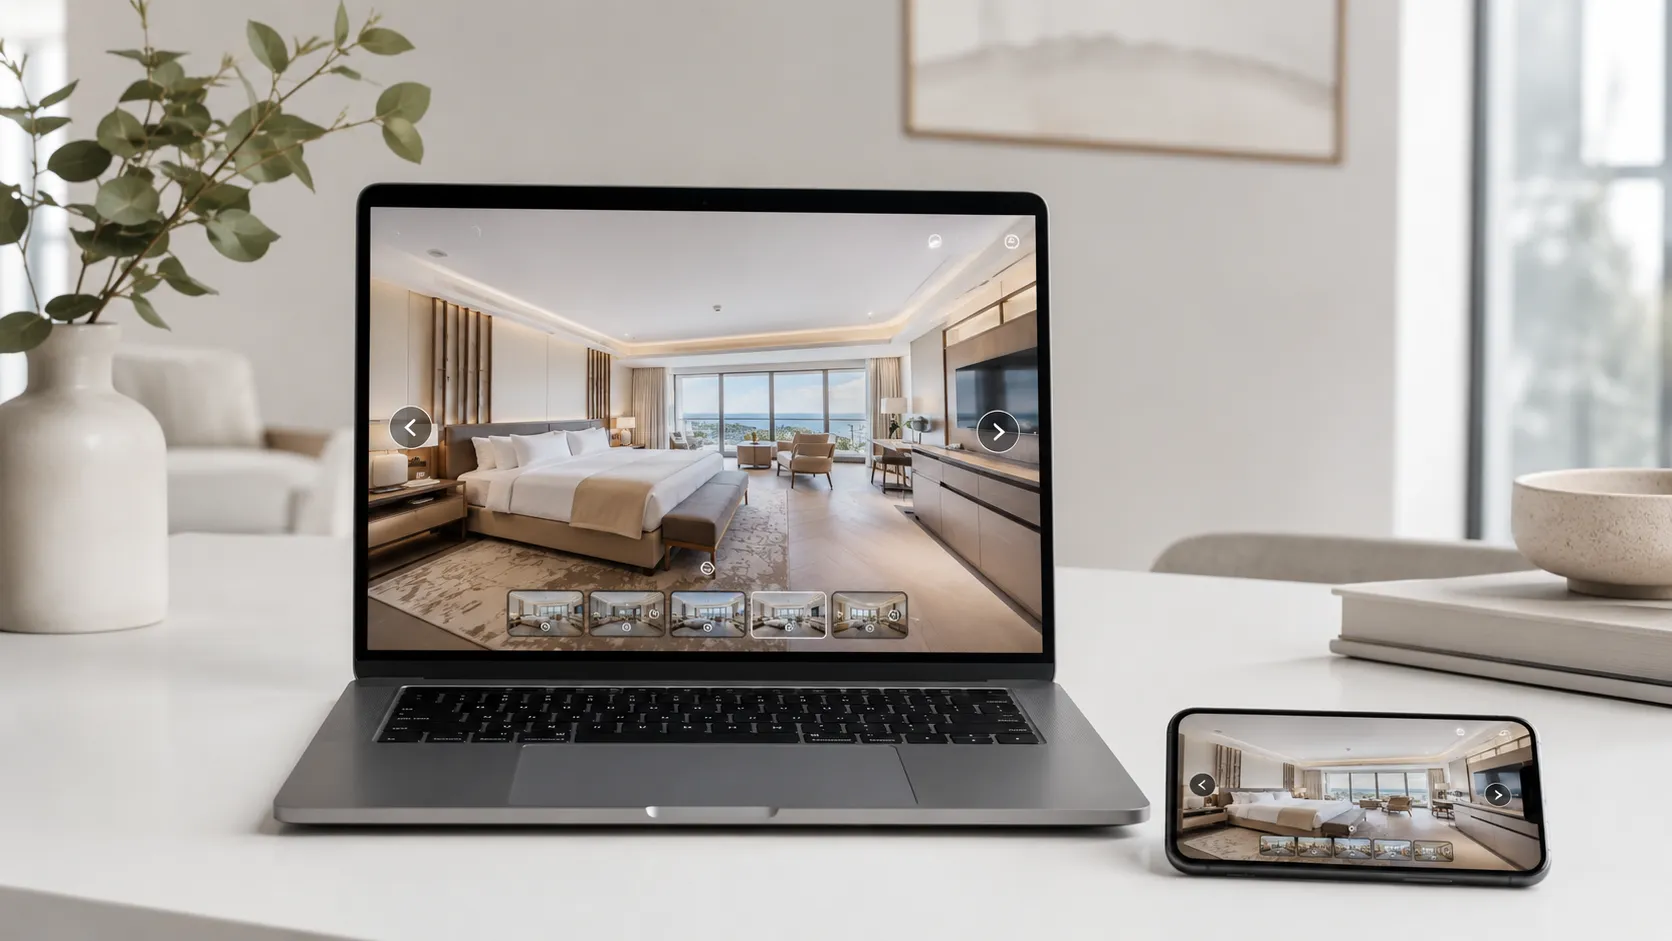
Integrating a virtual tour on your website means visitors can explore a 360° space directly on your page. They do not just see a large static image, and they are not redirected to an external gallery. They can rotate the view, move between rooms, click on interactive hotspots and discover details that standard photos cannot convey as clearly.
For a hotel, this can mean a more convincing presentation of the rooms. For a restaurant, it means people can see the atmosphere and dining area before they book. For real estate, it can reduce unnecessary inquiries because visitors get a much clearer sense of the layout and room sizes before requesting a viewing.
On the technical side, integration works through a code snippet generated by the platform. You copy it from Tours and paste it into your website. On WordPress or Wix you add it inside an HTML element. On a custom-built site you place it directly in the page code. On React or Angular projects you use the dedicated code option for that technology.
The biggest advantage is that you keep the visitor in the same context. The tour can sit right next to the room description, the contact form, the pricing section or the booking button. That makes the experience more cohesive and easier to act on.
How do you get the integration code in Tours?
In Tours, the integration code is generated automatically. You do not need to build it manually or dig through hidden settings. Once the tour is published, you find it in your tour list and open the integration options directly from there.
- Sign in to your Tours account.
- Open the My Tours page.
- Find the published tour you want to display on your website.
- Click the three-dot menu next to that tour.
- Select the Integration option.
- Confirm that integration is enabled.
- Add or update the allowed domains.
- Choose the code option for HTML, React, Angular, WordPress or Wix.
- Copy the generated code and paste it into the desired page on your website.
Each tour has its own integration settings. This matters especially when you manage multiple locations, multiple properties or multiple presentation pages. You can have one tour for the lobby, one for the rooms, one for the restaurant and another for an event space — each with its own code and its own allowed domains.
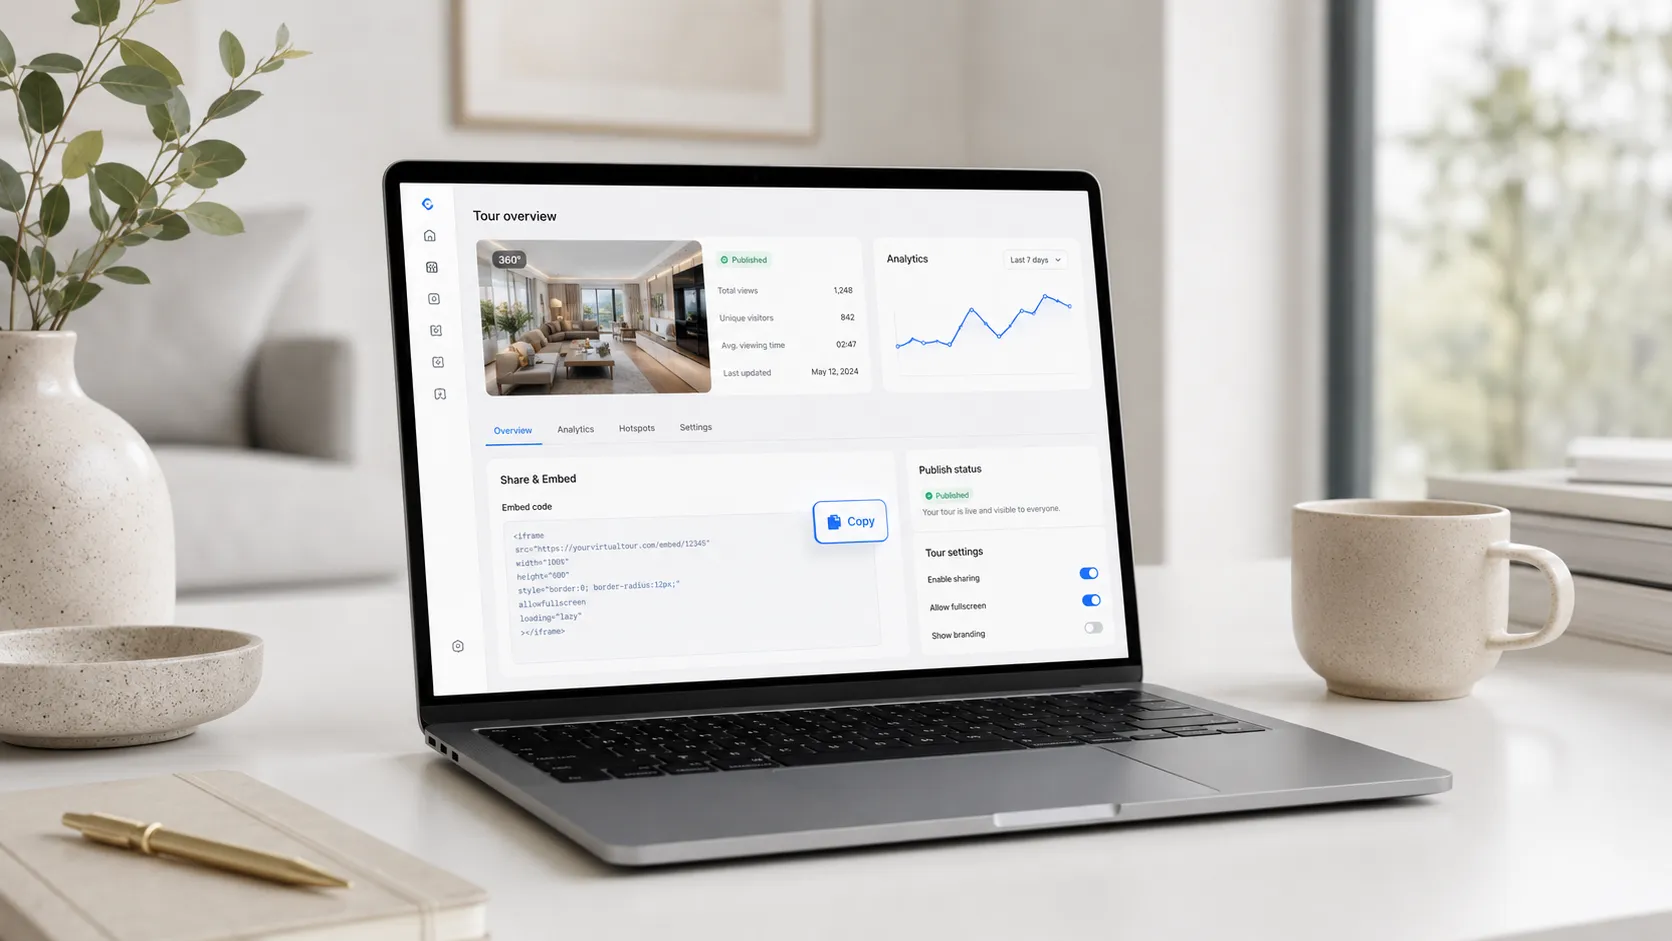
What can you configure in the Integration window?
The Integration window is not just a place to copy code. It is also where you control how the tour is used on external websites. From here you can disable the integration, restrict it to specific domains and choose the right code for your platform.
- Enable or disable: you can stop the tour from appearing on external websites without deleting it from your account.
- Allowed domains: choose which websites can display the tour, such as the hotel, restaurant or real estate agency domain.
- Platform selection: choose between HTML, React, Angular, WordPress and Wix.
- Ready-to-copy code: once you select a platform, the matching code appears below the selector.
- Separate settings per tour: each published tour can have its own integration rules.
The allowed domains list gives you meaningful control. For example, if you created a tour for a hotel's official website, you can restrict it to that domain only. If someone copies the code and tries to use it on a different site, the integration can be blocked.
Which option should you choose: HTML, React, Angular, WordPress or Wix?
Not every website is built the same way, so Tours gives you several code options. The idea is that you should not have to adapt the integration manually — just pick the right option and copy the generated code.
| Platform | When to choose this option | Where to place the code |
|---|---|---|
| HTML | For custom-built sites, simple pages or platforms that accept HTML code | In the page source or inside a custom HTML block |
| React | For websites or apps built with React or Next.js | In the component where you want the tour to appear |
| Angular | For projects built with Angular | In the appropriate component template |
| WordPress | For WordPress sites, regardless of whether you use Gutenberg, Elementor, Divi or the Classic Editor | Inside an HTML block, HTML element or code module |
| Wix | For sites built in the Wix editor | Inside the HTML integration element in the Wix editor |
If you are not sure which option to pick, the rule is straightforward: WordPress for WordPress, Wix for Wix, React for React or Next.js, Angular for Angular and HTML for any other site that accepts custom code.
Virtual tour integration on WordPress
On WordPress, the integration is fairly simple. Choose the WordPress option in Tours, copy the code and paste it into the page where you want the tour to appear. You do not need a dedicated virtual tour plugin as long as your theme or page builder lets you add custom HTML.
- In Gutenberg, add a Custom HTML block and paste the code.
- In Elementor, use the HTML widget and place the code in the desired section.
- In Divi, use the Code module.
- In WPBakery, use a raw HTML or custom code element.
- In the Classic Editor, switch to the Text / HTML view and insert the code where needed.
Pay attention to the space where you place the tour. If you squeeze it into a section that is too small, the experience will not look right. On desktop, a height of around 600px is usually a good starting point, and on mobile it is worth previewing the page before publishing.
Virtual tour integration on Wix
On Wix, choose the Wix option in Tours and copy the generated code. Then open the Wix editor and add an HTML integration element to the section of the page where you want the tour to appear.
- Open the desired page in the Wix editor.
- Add a new element from the + menu.
- Choose the integration or custom code section.
- Select the HTML element.
- Paste the code generated by Tours for Wix.
- Adjust the width and height for both desktop and mobile.
- Publish the page and test the tour on the live site.
If the tour appears cut off on Wix, the issue is almost always the size of the HTML element, not the code from Tours. Increase the height of the container, check the mobile version and make sure you have published the latest version of the page.
Integration on React, Angular, Webflow, Squarespace or HTML
If your site is not on WordPress or Wix, choose the option that fits your project. For a site built from scratch, the HTML option is usually enough. For modern web apps, you can use the React or Angular code.
- React / Next.js: use the React code option and place it in the component where you want the tour to appear.
- Angular: use the Angular code option in the appropriate component template.
- Webflow: add an integration element and paste the HTML code from Tours.
- Squarespace: add a code block and paste the HTML option.
- Shopify: place the code in a custom HTML section or a page template, depending on your theme.
- Plain HTML: insert the code directly where you want the tour to load.
If your platform does not allow custom code, you can use the public link for the tour or the QR code generated by Tours. That said, when you have the option, direct integration is the better choice for commercial pages because the visitor stays alongside your offer, contact form or booking button.
How do you create the tour before integrating it?
Before you can get to the integration code, you need a published tour. In Tours, the creation process is visual: you upload 360° scenes, organize them and add the interactive hotspots you need.
- Create an account on getours.app and open the Tours app.
- Go to My Tours and click the button to create a new tour.
- Fill in the required fields: tour name and category. Optionally add a location, price or tags.
- Upload the first 360° scene and give it a clear name.
- In the editor, add more scenes, navigation hotspots, information windows with text, images or video, external links and scene groups.
- If you want certain hotspots connected to the booking system, assign them internal tags that can be used for booking connections later.
- Click Publish and choose the visibility setting for the tour.
- After publishing, go back to My Tours, open the three-dot menu and select Integration.
In short, the editor is where you build the 360° experience, and the Integration window is where you add the tour to your website and control where it can be displayed.
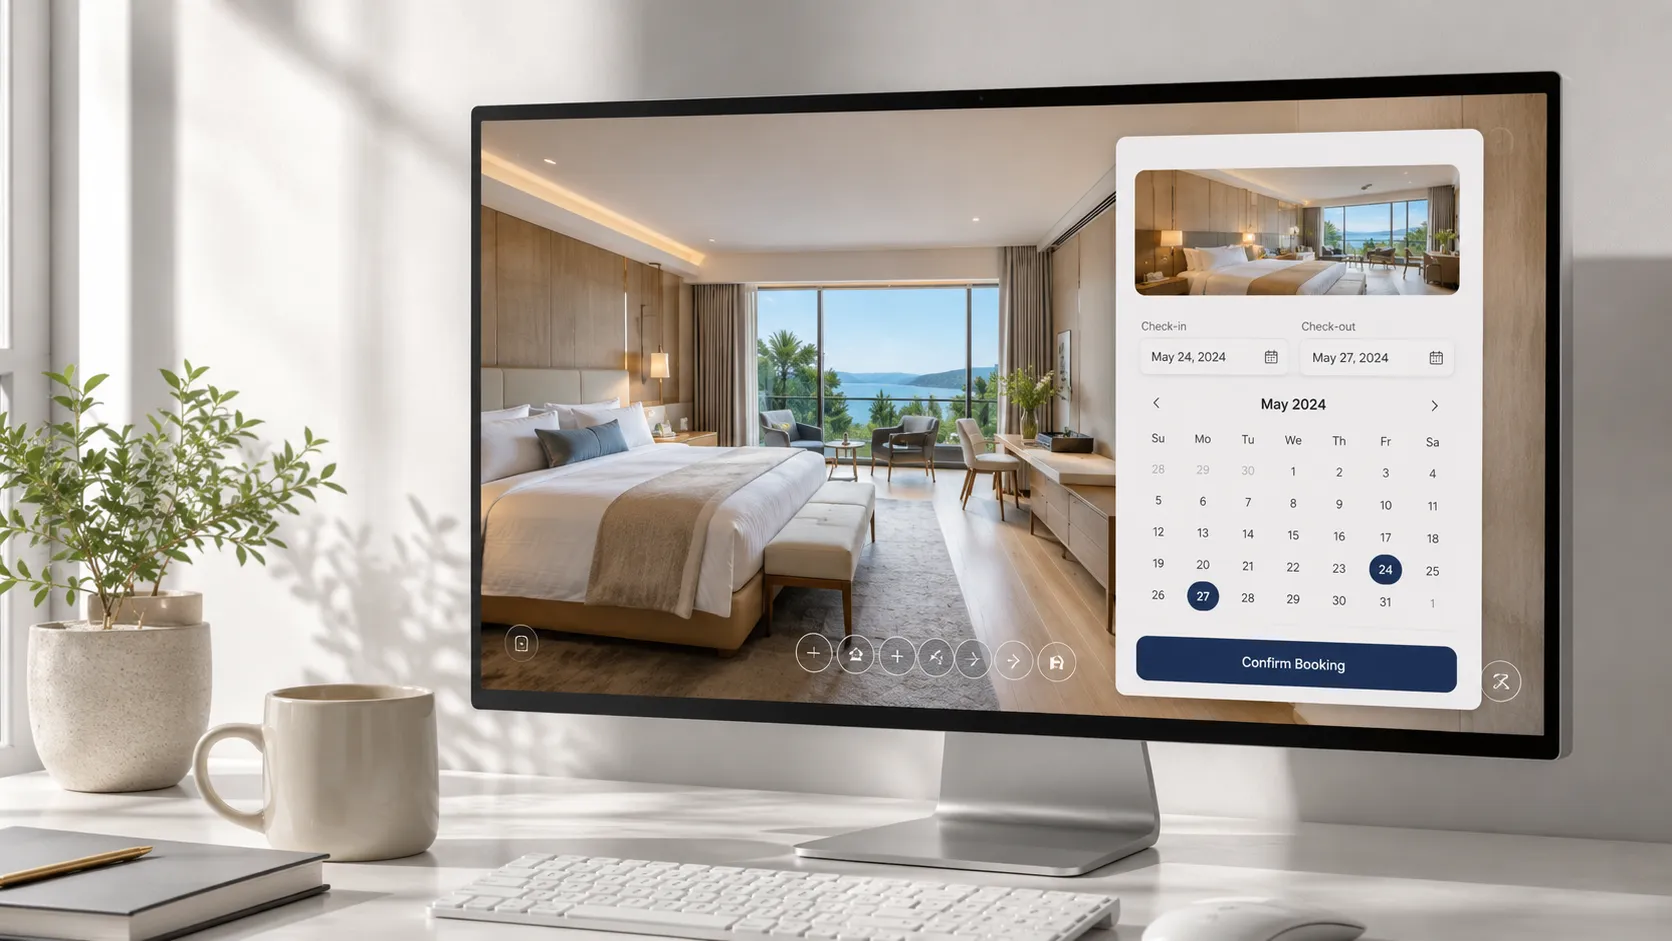
Can you show commercial actions inside the integrated tour?
Yes. If you have configured bookings in Tours, they work inside the integrated tour on your website as well. Visitors can explore the space and submit a reservation or request without leaving the page.
- Tour-level booking: display a booking button that is available throughout the entire tour experience.
- Scene-level booking: enable booking only in specific rooms or areas.
- Group-level booking: group multiple scenes together, which is useful for room types, apartments or different spaces.
- Hotspot booking: an interactive point inside the tour can open a booking window for a table, a room, a space or a viewing appointment.
- Tag-based bookings: multiple hotspots can share the same availability calendar when they are linked through the same tag.
Bookings are configured separately in Booking Manager. There you set availability, capacity rules, manual or automatic approval and the team members who handle incoming requests. After that, you connect Booking Manager to the tour, to specific scenes, to scene groups or to individual hotspots.
If you already use a PMS, a channel manager or other booking platforms, Tours can work as an additional visual channel. In situations where availability is managed across multiple systems, manual approval helps you avoid double bookings.
What does the visitor see in the integrated tour?
Visitors see exactly the experience you built in the Tours editor. It is not just a panoramic image placed on a page — it is an interactive tour that can include navigation, information, links, bookings and usage statistics in the background.
- 360° scenes that visitors can rotate in any direction.
- Navigation between rooms or areas through interactive hotspots.
- Information hotspots with text, images or video.
- External links to menus, catalogs, product pages or contact forms.
- A booking button or hotspots that open a booking window.
- Multilingual content, if you have configured it in the tour.
- Usage statistics on visits, scenes accessed and interactions.
Why is the tour not showing on my website?
If you have added the code to your site but the tour is not appearing, it does not automatically mean the integration is broken. In most cases a setting is missing or the code was placed somewhere that does not render it correctly.
- Check that the tour is published. An unpublished tour will not display correctly on your site.
- Check that integration is enabled in My Tours → three-dot menu → Integration.
- Check the allowed domains. Your site's domain must be on the accepted list.
- Make sure you selected the correct code option: WordPress for WordPress, Wix for Wix, React for React, Angular for Angular and HTML for everything else.
- If you are using Wix or a visual page builder, increase the height of the element where you placed the tour.
- Check whether your platform allows HTML or external code. Some free plans may have restrictions.
- Publish the page after pasting the code. Sometimes the tour appears in preview but not on the live site if the changes have not been published.
The fastest check is to go back to the Integration window, confirm that integration is active, that the domain is allowed and that the code option matches your platform. In most cases the issue is resolved without changing anything in the tour itself.
Comparison with other virtual tour platforms
Most virtual tour platforms offer some form of website integration. The difference shows up when you need more than just displaying the tour: domain control, bookings, usage statistics, multilingual content or code options for different technologies.
| Feature | Tours (getours.app) | Matterport | Kuula | Roundme |
|---|---|---|---|---|
| Website integration code | ✅ HTML, React, Angular, WordPress and Wix | ✅ Available | ✅ Available | ✅ Available |
| Allowed domains for integration | ✅ Configurable from the Integration window | ⚠️ Depends on plan and settings | ⚠️ Depends on plan and settings | ⚠️ Depends on plan and settings |
| Enable or disable per tour | ✅ Separate control for each published tour | ⚠️ Depends on tour settings | ⚠️ Depends on tour settings | ⚠️ Depends on tour settings |
| Integrated bookings inside the tour | ✅ Available in Tours, including on integrated tours | ❌ Not the primary focus | ❌ Not the primary focus | ❌ Not the primary focus |
| Interactive hotspots | ✅ Navigation, information, bookings and external links | ✅ Available | ✅ Available | ✅ Available |
| Usage statistics | ✅ Available in the Tours dashboard | ✅ Depends on plan | ⚠️ Depends on plan | ⚠️ Depends on plan |
| Multilingual content | ✅ Can be configured in Tours | ⚠️ Limited or indirect | ⚠️ Limited or indirect | ⚠️ Limited or indirect |
| QR code for the tour | ✅ Generated automatically | ⚠️ Depends on configuration | ⚠️ Depends on configuration | ⚠️ Depends on configuration |
With Tours, the goal is not just to place a panorama on your site. It is to make the tour a useful part of your page: presentation, interaction, booking, quote request or understanding how visitors engage with your space.
Frequently Asked Questions
How do I get the integration code for my virtual tour in Tours?
After the tour is published, go to My Tours, click the three-dot menu next to the tour and select Integration. In the window that opens you can enable integration, set allowed domains and choose the code for HTML, React, Angular, WordPress or Wix.
Do I need to publish the tour before integrating it on my website?
Yes. First create and publish the tour, then go to My Tours and open the Integration window. From there, copy the right code for your website.
What are allowed domains for virtual tour integration?
Allowed domains are the websites where the tour is permitted to appear. For example, you can restrict it to your hotel, restaurant or agency domain only. This gives you more control over where the tour is used.
Can I disable integration without deleting the tour?
Yes. From the Integration window you can stop the tour from appearing on external websites. The tour stays in your account and you can re-enable it at any time.
Does the integration code work on WordPress?
Yes. Choose the WordPress option in Tours and paste the code into an HTML block, HTML element or code module, depending on the editor you use: Gutenberg, Elementor, Divi, WPBakery or the Classic Editor.
Does the integration code work on Wix?
Yes. Choose the Wix option in Tours, then paste the code into an HTML integration element in the Wix editor. After that, adjust the element size and publish the page.
What should I choose if I have a custom site, React or Angular?
For a custom-built site, choose HTML. For React or Next.js, choose the React option. For Angular, choose the Angular option. Tours displays the matching code once you select your platform.
Does the integrated tour update automatically when I make changes in Tours?
Yes. If you update scenes, hotspots, text or other settings in the Tours editor, the changes are reflected in the integrated tour on your website as well. You do not normally need to copy the code again.
Can I integrate a virtual tour with bookings on a hotel website?
Yes. In Tours you can connect bookings to the entire tour, to a specific scene, to a scene group or to an individual hotspot. For hotels, this can be useful for rooms, the lobby, the restaurant or event spaces.
Can I integrate a virtual tour for a property or viewing request?
Yes. The tour can be placed on the property page, and hotspots can direct visitors to a viewing request, a contact form or a time-slot booking.
Why is the integrated tour not showing on my website?
Check that the tour is published, that integration is enabled, that your site's domain is on the allowed list and that you copied the correct code option. On Wix or in visual page builders, also check the height of the HTML element — a container that is too small can make the tour appear cut off or invisible.
Can I add multiple virtual tours to the same website?
Yes. Each published tour has its own integration code and its own settings. You can have different tours on different pages — for example, for rooms, the restaurant, the lobby, a showroom or event spaces.
Can I use a QR code instead of the website integration code?
Yes. Tours can generate a QR code for published tours. QR codes are useful for printed materials, reception desks, brochures or posters. For your website, direct integration is usually the better option because visitors can explore the tour without leaving the page.
Do I need a developer to integrate the tour?
Not in most cases. On WordPress and Wix you can add the code through the visual editor. For custom sites, React or Angular projects, it is more appropriate to have a developer place it, but the code is already generated by Tours.
If you want to test the integration, start with a simple tour. Create your account, publish your first tour, go to My Tours, open Integration and copy the code for your platform. In a few minutes you can have a 360° tour displayed directly on your website, with interactive hotspots, bookings and usage statistics ready for real use.